A preview of the on-premises SSRS with support for Power BI is now in preview. We'll technically, it's called "Power BI Report Server" preview. But under the covers, as far as we know, it is an enhanced version of SSRS. For the SQL Server 2016 release, Microsoft completely rebuilt the SSRS engine, with full support for HTML5, and now Power BI Desktop reports.
About a year ago, we reported that both the SSRS and Power BI teams indicated future Power BI support as part of SSRS. And earlier in the year, we did an initial review of the Azure based VM that included the enhanced SSRS engine. That review found that SSRS did indeed do a nice job with Power BI Desktop reports.
The preview download is available here: Microsoft Power BI Report Server - May 2017 Preview.

Showing posts with label SSRS. Show all posts
Showing posts with label SSRS. Show all posts
Thursday, May 25, 2017

Monday, May 8, 2017
Power BI Desktop to SSRS -
Back on November 10, 2016, we wrote about the coming support for Power BI Desktop reports by SSRS. See Upload Power BI Desktop .pbix to SSRS 2016. We'll a few days ago, on May 3, 2017, the SSRS Team Blog posted an announcement that it was almost ready. Almost.
It's called Power BI Report Server, and as of May 8, 2017, it is still in the "...coming soon." status. The sort-of good news is that if you have an Enterprise Edition, per-core license, with Active Software Assurance (SA), it is included. Or if you have Power BI Premium licenses. For all the rest of us, we'll not so much. If you have looked over our earlier review, it seamlessly worked with SSRS's rebuild engine. So, we are hoping that this is still the case.
You can review the official Power BI Report Server introduction here: Introducing Power BI Report Server , along with the SSRS Team Blog here: Introducing Power BI Report Server for on-premises Power BI report publishing.
It's called Power BI Report Server, and as of May 8, 2017, it is still in the "...coming soon." status. The sort-of good news is that if you have an Enterprise Edition, per-core license, with Active Software Assurance (SA), it is included. Or if you have Power BI Premium licenses. For all the rest of us, we'll not so much. If you have looked over our earlier review, it seamlessly worked with SSRS's rebuild engine. So, we are hoping that this is still the case.
You can review the official Power BI Report Server introduction here: Introducing Power BI Report Server , along with the SSRS Team Blog here: Introducing Power BI Report Server for on-premises Power BI report publishing.
Thursday, November 10, 2016
Upload Power BI Desktop .pbix to SSRS 2016
With the preview release of SSRS 2016 with support for Power BI Desktop reports, we wanted to test out just how easy - or difficult it would be to actually upload a report to SSRS 2016 with support for Power BI .pbix reports. Actually, it is pretty easy.
See also: Setup SSRS 2016 with support for Power BI Desktop in VirtualBox for how to
get your own copy as a virtual machine on Azure.
With our local virtual machine up and running, we wanted to be able to create a new Power BI Desktop report on our own workstation, and then upload the report to the preview SSRS server. To do this we had to take a few extra steps to get our VM ready for external connections.

You will get a challenge/response:

Connect using the admin/pw credentials for the server, or others you setup earlier. You will get a page that looks like this:
Notice the Power BI Desktop Reports section at the bottom.

1. On the menu bar, locate the Upload button and select

2. Select your .pbix file:
This brings up a pop-up file selection window. Locate and select your .pbix file, and then select/click the Open button. Your .pbix file will go directly into the "Power BI Desktop Reports" section.

That is it. Your Power BI Desktop Report will be available for review.
[the (PBID July 2016) just tells us that we built this report with the Power BI Desktop July 2016 release - Version: 2.37.4464.461 64-bit (July 2016).

If you try to open the .pbix file you created in a newer version on the VM using the 2.39.4526.801 64-bit (September, 2016) installed on the VM, you will get this message:
No worries, just use an older copy of Power BI Desktop - or use the one in the VM. Longer term, we suspect that this will be resolved.

Overview
While the process is easy to upload a Power BI Desktop .pbix report to SSRS 2016, reports are loaded using a browser connected to SSRS. At least for the Preview, you cannot use Power BI Desktop to upload or publish reports to SSRS. Since our immediate goal is to run a .pbix report on SSRS, this not really an issue.
See also: Setup SSRS 2016 with support for Power BI Desktop in VirtualBox for how to
get your own copy as a virtual machine on Azure.
With our local virtual machine up and running, we wanted to be able to create a new Power BI Desktop report on our own workstation, and then upload the report to the preview SSRS server. To do this we had to take a few extra steps to get our VM ready for external connections.
On the SSRS Server:
- Enable TCP/IP: on our preview VM, use SQL Server Configuration Manager and then enable TCP/IP. You'll need to stop/restart services.
- Open ports to allow external access to SQL Server. See: Script to open ports for SQL Server
In SSRS (this is optional, depending on the user to log in)
- SSRS Preview: On the desktop, open the link that takes you to the SSRS portal. Naviage to the security section, and add the user you will use to connect to SSRS, and enable the appropriate roles. (or add to the server Administrators group)
Optional: or, you can just connect remotely using the admin/pw for the server when you set it up - your choice.

Connect via Browser
Get the reporting server URL and connect using a browser on your remote workstation. You can do this on the VM, but we wanted to test our ability to upload a .pbix remotely. And while we typically use Chrome, for this, we used Edge. It is actually very fast, faster than Chrome, but does not yet have a Norton plug-in for web security.You will get a challenge/response:

Connect using the admin/pw credentials for the server, or others you setup earlier. You will get a page that looks like this:
Notice the Power BI Desktop Reports section at the bottom.

Upload a new Power BI Desktop Report
We created several new reports using Power BI Desktop on our workstation that used the databases on our SSRS 2016/Power BI VM. Now, it was time to upload them to SSRS.1. On the menu bar, locate the Upload button and select

2. Select your .pbix file:
This brings up a pop-up file selection window. Locate and select your .pbix file, and then select/click the Open button. Your .pbix file will go directly into the "Power BI Desktop Reports" section.

That is it. Your Power BI Desktop Report will be available for review.
[the (PBID July 2016) just tells us that we built this report with the Power BI Desktop July 2016 release - Version: 2.37.4464.461 64-bit (July 2016).

Notes, warnings and other considerations
- Version of Power BI Desktop
- Folders
- What's missing
Version of Power BI Desktop.
For this preview, you will need to use either the September, 2016 version, or an earlier version. The preview uses version: 2.39.4526.801 64-bit (September, 2016). The October version did not work for us. We used a July version of Power BI Desktop for our tests. If you use a new version, you will get this error: |
| An error has occurred. Something went wrong. Please Try again later. |
 |
| Unable to Open Document .pbix is incompatible with your current version of Power BI Desktop |
Custom Folders
If you want your .pbix file to reside in a custom folder, no problem. First navigate to your folder, and then start the upload process. If the folder does not yet have a section labeled "Power BI Desktop Reports" the upload process will first create one. Below is a new folder where the upload process automagically created the "Power BI Desktop Reports" section.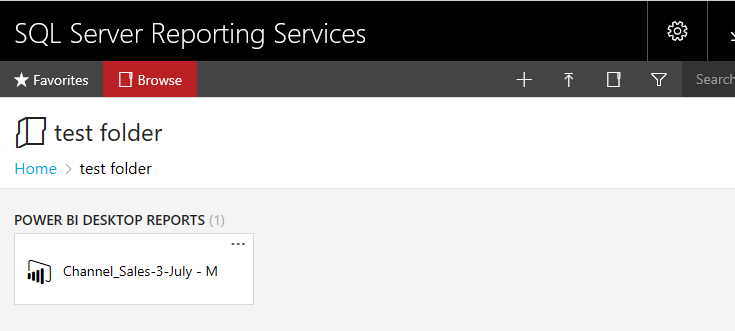
What's Missing?
It's a preview, and a great start at that. Still, there are some items that are not in the SSRS preview. Let's take a look at the one's we have identified so far in our review:- Dashboards - at least for now, SSRS only supports reports
- Natural Language Queries
- Quick Insights
Setup SSRS 2016 with support for Power BI Desktop in VirtualBox
SSRS 2016 supporting Power BI Desktop reports is now in
preview on Azure. But for many of us, we'd rather be able to review this in our
own virtual environment, and more specifically - VirtualBox. We'll now you
can.
Our starting point was a blog posting my Microsoft employee
Christopher Finlan outlining the steps needed to setup this preview in a
Hyper-V environment. A great start, but what we wanted was the ability to run
it Virtual Box. Fortunately for us, running the downloaded VHD in VirtualBox is
much easier than Hyper-V.
Also see: Upload Power BI Desktop .pbix to SSRS 2016
Also see: Upload Power BI Desktop .pbix to SSRS 2016
Overview of Steps
- In Azure, create a new SSRS-PowerBI preview virtual machine
- Download the Azure VHD
- Create a new VirtualBox VM - without storage/virtual harddisk
- Update the VM settings and add the downloaded VHD
- Start the VM, log in, and add VirtualBox Guest Additions
- Delete your Azure virtual image and both storage items
- or pay about $5.00 a day in storage costs.
Detailed Steps
Create a new Azure SSRS 2016 with Power BI Desktop support.
Rather than repeat what has been done - you can just follow the steps outlined on MSDN. Keep a record of both the admin login name and the password.
Download the VHD for you newly created Azure image
Again, just follow the steps outlined by Christopher
Finlan on his posting. We plan to use VirtualBox, so when following Finlan's steps, you only need to download the VHD. After that, you can stop. Using VirtualBox, these is no need to do the other steps he has outlined to get it to work with Hyper-V. We used Microsoft's Azure Storage Explorer to great success.
Create a new VirtualBox machine
And then update the configuration settings for your new VM
Start with these settings
- General - use defaults
- System
- Motherboard:
- memory: 8+ GB,
- floppy: disable
- others: go with defaults
- Processor: 4+
- All others: use defaults
- Display use defaults
- Storage
- move your downloaded VHD to your newly created VM folder. Not required, but it helps to keep the folders well organized
- attach VBoxGuestAdditons.iso to the CD/DVD
- Audio - defaults (disabled)
- Network - we use the bridged Adapter
- Serial Ports - defaults (disabled)
- USB - use defaults (disabled)
- Shared folders - we usually hold off on this until we install Guest Additions
- User Interface - defaults
Start up the VM in VirtualBox
On first start-up, it takes several minutes. Login with your pre-configured admin login and password. After login, we were greeted with a Swap-file warning. Review the paging file settings, and adjust as necessary.

Install VirtualBox Guest Additions
While not necessary, adding Guest Additions allows us to use shared folders. A very nice plus.
Delete your Azure VM and both storage files
When created, the Azure VM sets up two storage files. The smaller +/- 133 GB VHD file you download. The other one is over 1 Terabyte. Naturally, you do not need to delete them, but we found that but left on Azure - even if it is turned off, it will run you about $5.00 a day in
storage costs.
Thursday, October 27, 2016
SSRS support for Power BI - in technical Preview!
If you love Power BI, but want a localized server option using SSRS, well its coming.
Announced on October 25, 2016 on the Power BI blog, they are releasing it into technical preview. For this first review, you'll need an Azure account. No mention of when a local, on-premises preview will be available, but still this is great news.
See: Technical Preview of Power BI reports in SQL Server Reporting Services
Video - here's a video showing Power BI against SSRS 2016
Create a modern enterprise reporting and mobile BI solution with SQL Server 2016
Ok, what you really want is to run a localized VM version. Christopher Finlan has added a posting that outlines how you can download the VM from Azure and get it up and running as a localized VM. Find that post here: How to run the Technical Preview of Power BI Reports in SQL Server Reporting Services on-prem using Hyper-V
Announced on October 25, 2016 on the Power BI blog, they are releasing it into technical preview. For this first review, you'll need an Azure account. No mention of when a local, on-premises preview will be available, but still this is great news.
See: Technical Preview of Power BI reports in SQL Server Reporting Services
Video - here's a video showing Power BI against SSRS 2016
Create a modern enterprise reporting and mobile BI solution with SQL Server 2016
Can I try it out on-premises?
Ok, what you really want is to run a localized VM version. Christopher Finlan has added a posting that outlines how you can download the VM from Azure and get it up and running as a localized VM. Find that post here: How to run the Technical Preview of Power BI Reports in SQL Server Reporting Services on-prem using Hyper-V
Monday, June 13, 2016
SSRS 2016 - Create a Shared DataSet
The creation of a shared dataset first starts with a shared data source. ( see SSRS 2016 - Create a Shared Data Source). And like shared data sources, shared datasets are effectively objects of the report server that reside on the report server.
Once you have a shared data source, you use the Report Builder to create a new shared dataset.
Here, you can simply startup the Report Builder, or start from the SSRS web portal, which takes you to the New Report of Dataset form within Report Builder. Be sure to get the latest Report Builder. You can find the link to the latest version here - SSRS 2016 - stand alone Report Builder gets an update.


Once you have a shared data source, you use the Report Builder to create a new shared dataset.
Here, you can simply startup the Report Builder, or start from the SSRS web portal, which takes you to the New Report of Dataset form within Report Builder. Be sure to get the latest Report Builder. You can find the link to the latest version here - SSRS 2016 - stand alone Report Builder gets an update.
Summary:
- Navigate to the New Report or Dataset form in Report Builder
- From the SSRS web portal
- Login into the portal (typically http[s]://[servername]/reports )
- Click on the menu item +New
- Select Dataset
- From within Report Builder
- Menu: File | New
- Popup: Choose New Dataset from the options on the left of the
New Report or Dataset form - Select your desired shared data source from the list
- Build your query in the Query Designer
- either as text
- or with the designer tools
- Save your shared dataset
Report Builder connected to your SSRS server
Report Builder will need to be connected to your desired SSRS server. You can verify the connection simply by reviewing the current report server listed at the bottom of the report builder screen.

If you need to update or adjust this, follow the menu: File | Options (button)

New Report or Dataset
Once you have navigated to the New Dataset section of the New Report or Dataset form, you are ready to select the desired shared data source. A shared dataset, as an object of the report server, requires a shared data source. Make your choice and the select the Create button.

Dataset Query Designer
This takes you to the dataset query designer. You can switch to the "Edit as Text" form, or use the graphical query designers tools and options to build your query.

Stored Procedure or Text (Select)
One of the great features of SSRS is the ability to run stored procedures. If you are using a stored procedure, locate the Command Type combo box, and choose Stored Procedure.

Saving
Once the query is all set and tested, use the menu commands File | Save (or Save as). This will bring up a Save as Dataset popup. Add your desired dataset name, and click OK. Your shared dataset is now ready to be used.
You can find the MSDN details on datasets here: Report Embedded Datasets and Shared Datasets (Report Builder and SSRS)
You can find the MSDN details on datasets here: Report Embedded Datasets and Shared Datasets (Report Builder and SSRS)
SSRS 2016 - Create a Shared Data Source
The easiest way to create a shared data source in SSRS 2016
is to start with the reporting services web portal. Remember that a shared data source is an object of the report server. At this time, I have not worked out a way to created a shared data source from within the 2016 Report Builder.
Summary:
- Login into the portal (typically http[s]://[servername]/reports )
- Click on the menu item +New
- Select Data Source
- Add data source properties and save
Select +New Data Source

Add new data source form

Newly created Data Source

Using a Shared Data Source
With the data source created, you can now use it in Report Builder. Simply right click on Data Sources, and select New Data Source:
Add New Data Source

In the Data Source Properties, select "Use a shared connection or report model" [the default value], and then click on the Browse button.
Use a shared connection or report model

This will bring up the available list of data sources registered with your SSRS server.
Select desired Data Source

Highlight the desired data source, and click on the 'Open' button. The Data Source properties window will now have your selected data source. Test Connection and then click on "OK"
New Data Source Properties

After clicking on "OK" your new shared data source is listed. Notice the small box with the curved arrow - that tells you it is a shared data source.

Thursday, June 9, 2016
SSRS 2016 - Setup Admin and User access to your report server
After installation of SSRS,2016, as well as with older versions, the only user that has access is the account that did the installation. Usually a system administrator. And how to get access to SSRS is a often popular question. For 2016, here are the steps to setup a new user so they can gain access to SSRS.
1. Settings: - select the Settings button on the top right
2. Site Settings menu: - select the Site settings menu item
3. Security: - on the left menu, select Security
4. Add group or user - select the + Add group or user button
5. Group or user: - type in your new group or user and select the correct role(s)
 |
| Setting Option on the Top Menu |
 |
| Sites settings menu option |
 |
| Security Menu option on the left bar |
 |
| + Add group or user form |
SQL 2016 - SSRS - Error 503
After setting up SQL Server 2016 Reporting Services, you cannot connect to the new SSRS 2016 Web Portal. For the the June 1, 2016 General Availability (GA) release, the URL is http://[ComputerName]/reports.
We had issues with the pre-release versions, and with the initial setup of SSRS, we still have an occasional Error 503.

After stopping, and restarting the SSRS service using the SS Configuration Manager, we were able to connect to the new SSRS service.
We had issues with the pre-release versions, and with the initial setup of SSRS, we still have an occasional Error 503.

After stopping, and restarting the SSRS service using the SS Configuration Manager, we were able to connect to the new SSRS service.
Wednesday, June 1, 2016
SQL Server 2016 Now Available - June 1, 2106
Via email, Microsoft announced general availability (GA) for SQL Server 2016.
The latest SQL Server has made great advances, especially in significant enhancements to the supplemental components, along with the core database engine. SSRS was completely overhauled (see my article in Redmond Magazine: SSRS Steps up in the shadow of Power BI). Master Data Services has been enhanced, and PolyBase, the magic bridge between the relational world and the unstructured world, has been included into the core, standalone system (see my PolyBase page reference guide: PolyBase). You can find a summary of the enhancements and changes to SQL Server 2016 in my article SQL Server 2016 Preview Reveals path to Azure and Big Data.
The latest SQL Server has made great advances, especially in significant enhancements to the supplemental components, along with the core database engine. SSRS was completely overhauled (see my article in Redmond Magazine: SSRS Steps up in the shadow of Power BI). Master Data Services has been enhanced, and PolyBase, the magic bridge between the relational world and the unstructured world, has been included into the core, standalone system (see my PolyBase page reference guide: PolyBase). You can find a summary of the enhancements and changes to SQL Server 2016 in my article SQL Server 2016 Preview Reveals path to Azure and Big Data.
Monday, May 2, 2016
SQL Server 2016 - June 1st release date
Today, on the SQL Server Blog, the team announced that their target date for general availability (GA) will be June 1st, 2016.
Over the past year, Microsoft has made some major enhancements to SQL Server 2016, many of which you find here in our blog. PolyBase is one of the biggest, allowing real-time, T-SQL based access to all of your data stored in Hadoop or Azure. They have completely rebuilt Reporting Services (SSRS) in the image of Power BI 2.0, and made significant upgrades to Master Data Services (MDS). A good starting point is our article on Redmond Magazine:
SQL Server 2016 Preview Reveals Path to Azure and Big Data.
You can find more detail about the pending release at Get ready, SQL Server 2016 coming on June 1st
Over the past year, Microsoft has made some major enhancements to SQL Server 2016, many of which you find here in our blog. PolyBase is one of the biggest, allowing real-time, T-SQL based access to all of your data stored in Hadoop or Azure. They have completely rebuilt Reporting Services (SSRS) in the image of Power BI 2.0, and made significant upgrades to Master Data Services (MDS). A good starting point is our article on Redmond Magazine:
SQL Server 2016 Preview Reveals Path to Azure and Big Data.
You can find more detail about the pending release at Get ready, SQL Server 2016 coming on June 1st
Tuesday, April 26, 2016
SSRS 2016 - Branding - Magic Decoder Ring
Starting with SSRS 2016, you now have the ability to brand your website. Great, but once you open up the JSON file, you do not know where to start. While still incomplete, I have started a magic decoder ring for the various JSON listed items, and what they are used for in SSRS 2016.
If you have any additions or corrections,please send them so I can update the listing.
The brand package files include: metadata.xml, logo.png, colors.json
File: colors.json
-
If you have any additions or corrections,please send them so I can update the listing.
The brand package files include: metadata.xml, logo.png, colors.json
File: colors.json
{
|
Object Type
|
Object Description
|
Object Details
|
|||
name:"RealizedDesign",
|
||||||
version:"1.0",
|
||||||
interface:{
|
||||||
primary:"#b31e1e",
|
Button
|
General
|
Primary
"active" color; Upload brand package button
|
|||
primaryAlt:"#ca0806",
|
Button
|
General
|
Mouse over 'active"
|
|||
primaryAlt2:"#621013",
|
Button
|
Top Menu Button
|
Mouse over
'active";Top level menu items, such as Settings, Downloads
|
|||
primaryAlt3:"#e40000",
|
Button
|
Button - Browse
|
Primary active, main page
only; Browse, Favorites, when active
|
|||
primaryAlt4:"#e14e50",
|
Button
|
Home, Edit
|
The 'Home' display ,
'Edit' in settings, security
|
|||
primaryContrast:"#fff",
|
Button
|
Text Color in Buttons
|
Both active and mouse
over
|
|||
secondary:"#042200",
|
Banner
|
Top
|
||||
secondaryAlt:"#0f4400",
|
Banner
|
Second level & Left side
bar
|
When not active
|
|||
secondaryAlt2:"#155500",
|
Banner
|
Left Side Bar
|
Active/Mouse Over
|
|||
secondaryAlt3:"#217700",
|
??
|
|||||
secondaryContrast:"#49e63c",
|
Text
|
Text color, top banner,
side bar, browse, favorites, top level buttons
|
||||
neutralPrimary:"#d8edff",
|
Banner
|
Third level
|
||||
neutralPrimaryAlt:"#c9e6ff",
|
Background
|
Home page, Favorites
|
||||
neutralPrimaryAlt2:"#aedaff",
|
??
|
|||||
neutralPrimaryAlt3:"#88c8ff",
|
??
|
|||||
neutralPrimaryContrast:"#0a2b4c",
|
Text
|
Text Color in third
Banner
|
||||
neutralSecondary:"#e9d8eb",
|
Background
|
Background-open text
fields, back color for Settings-security, schedules, and maybe text for home
page text: KPI's, Mobile reports,
paginated reports, etc.
|
||||
neutralSecondaryAlt:"#d9badc",
|
??
|
Had some affect on the
Home page background
|
||||
neutralSecondaryAlt2:"#b06cb5",
|
??
|
|||||
neutralSecondaryAlt3:"#a75bac",
|
Text
|
Buttons
|
Download, Contect,
Visibility - in various buttons
|
|||
neutralSecondaryContrast:"#250a26",
|
||||||
neutralTertiary:"#f79220",
|
||||||
neutralTertiaryAlt:"#f8a54b",
|
||||||
neutralTertiaryAlt2:"#facc9b",
|
||||||
neutralTertiaryAlt3:"#fce3c7",
|
||||||
neutralTertiaryContrast:"#391d00",
|
||||||
danger:"#ff0000",
|
||||||
success:"#00ff00",
|
||||||
warning:"#ff8800",
|
||||||
info:"#00ff",
|
||||||
dangerContrast:"#fff",
|
||||||
successContrast:"#fff",
|
||||||
warningContrast:"#fff",
|
||||||
infoContrast:"#fff",
|
||||||
kpiGood:"#4fb443",
|
||||||
kpiBad:"#de061a",
|
||||||
kpiNeutral:"#d9b42c",
|
||||||
kpiNone:"#333",
|
||||||
kpiGoodContrast:"#fff",
|
||||||
kpiBadContrast:"#fff",
|
||||||
kpiNeutralContrast:"#fff",
|
||||||
kpiNoneContrast:"#fff"
|
||||||
},
|
||||||
theme:{
|
||||||
dataPoints:[
|
||||||
#0072c6,
|
||||||
#f68c1f,
|
||||||
#269657,
|
||||||
#dd5900,
|
||||||
#5b3573,
|
||||||
#22bdef,
|
||||||
#b4009e,
|
||||||
#008274,
|
||||||
#fdc336,
|
||||||
#ea3c00,
|
||||||
#00188f,
|
||||||
#9f9f9f
|
||||||
],
|
||||||
good:"#85ba00",
|
||||||
bad:"#e90000",
|
||||||
neutral:"#edb327",
|
||||||
none:"#333",
|
||||||
background:"#fff",
|
||||||
foreground:"#222",
|
||||||
mapBase:"#00aeef",
|
||||||
panelBackground:"#f6f6f6",
|
||||||
panelForeground:"#222",
|
||||||
panelAccent:"#00aeef",
|
||||||
tableAccent:"#00aeef",
|
||||||
altBackground:"#f6f6f6",
|
||||||
altForeground:"#000",
|
||||||
altMapBase:"#f68c1f",
|
||||||
altPanelBackground:"#235378",
|
||||||
altPanelForeground:"#fff",
|
||||||
altPanelAccent:"#fdc336",
|
||||||
altTableAccent:"#fdc336"
|
||||||
}
|
||||||
}
|
||||||
-
Subscribe to:
Posts (Atom)